Getting Started with Polygon: Deploying Your First Smart Contract On PoS
Looking to learn about deploying your first smart contract on PoS? Here’s your complete guide.

Ready to dive into the world of deploying smart contracts on Polygon? Polygon, with its Ethereum compatibility, offers faster transactions and lower costs, making it a great choice for your projects.
Whether you're a seasoned developer or just starting out, this guide will walk you through the essentials using Hardhat, Remix, and Replit.
So Let's get started.
What is Polygon?
Polygon, formerly known as Matic Network, is a Layer 2 scaling solution for Ethereum, designed to improve its scalability and usability without compromising security. It offers a framework for building and connecting Ethereum-compatible blockchain networks. By handling transactions off the main Ethereum chain, Polygon reduces congestion and lowers transaction costs, making it a popular choice for developers.
It supports various scaling solutions like Plasma, sidechains, PoS, and zk-Rollups and is fully compatible with existing Ethereum dApps and smart contracts. As adoption grows, securing Polygon smart contracts becomes critical to ensure robust protection and trust in deployed protocols.
Polygon's ecosystem boasts a range of dApps, DeFi platforms, and NFT projects, leveraging its high throughput, low fees, and robust security features.
What You Will Do
You'll learn how to deploy a Solidity smart contract on the Polygon network using three different tools: Hardhat, Remix, and Replit.
Each tool offers a unique approach to deploying contracts, providing a comprehensive understanding of various deployment methods.
Book a free consultation call for your smart contract audits
“QuillAudits provided security enhancements for projects, earning positive feedback for their prompt high-quality service as an auditing partner“
Using Hardhat
- Setup Hardhat Project: Initialize a Hardhat project and install dependencies.
- Write a Smart Contract: Create and write a smart contract in Solidity.
- Compile the Contract: Use Hardhat to compile the smart contract.
- Deploy to Polygon Amoy Testnet: Deploy the contract using a script and connect to the Polygon Amoy testnet.
- Verify the Contract: Verify the deployed contract on Polygonscan.
Using Remix
- Create a File on Remix: Use Remix IDE to create and manage Solidity files.
- Write a Smart Contract: Write a smart contract in the Remix IDE.
- Compile the Contract: Compile the contract directly in Remix.
- Deploy to Polygon Amoy Testnet: Connect MetaMask to the Amoy testnet and deploy the contract.
- Verify the Contract: Verify the contract on Polygonscan.
Using Replit
- Create a Replit Account: Sign up and create a Replit account.
- Create a Repl Environment: Set up a Solidity starter project.
- Write a Smart Contract: Use Replit to write your smart contract.
- Deploy to Polygon Amoy Testnet: Deploy the contract using Replit’s deployment tools.
- Verify the Contract: Verify the deployed contract on Polygonscan.
- Publish to Replit Profile: Publish your project on Replit for others to see.
Prerequisites
Regardless of the tool you choose, make sure you have the following prerequisites:
- MetaMask Wallet: Install MetaMask and create a new account.
- Polygon Configuration on MetaMask: Configure the Polygon Amoy testnet on MetaMask.
- Testnet Tokens: Obtain test MATIC tokens for gas fees.
- Basic Knowledge of Solidity: Understanding the basics of Solidity and smart contract development.
Step 1: Setting Up the Project
Create a New Directory for Your Project
Open your terminal and run the following commands:
1mkdir polygon-hardhat
2cd polygon-hardhat
3npm init -y
Install Hardhat
Install Hardhat and its dependencies:
1npm install --save-dev hardhat @nomicfoundation/hardhat-toolbox dotenv
2
Create a Hardhat Project
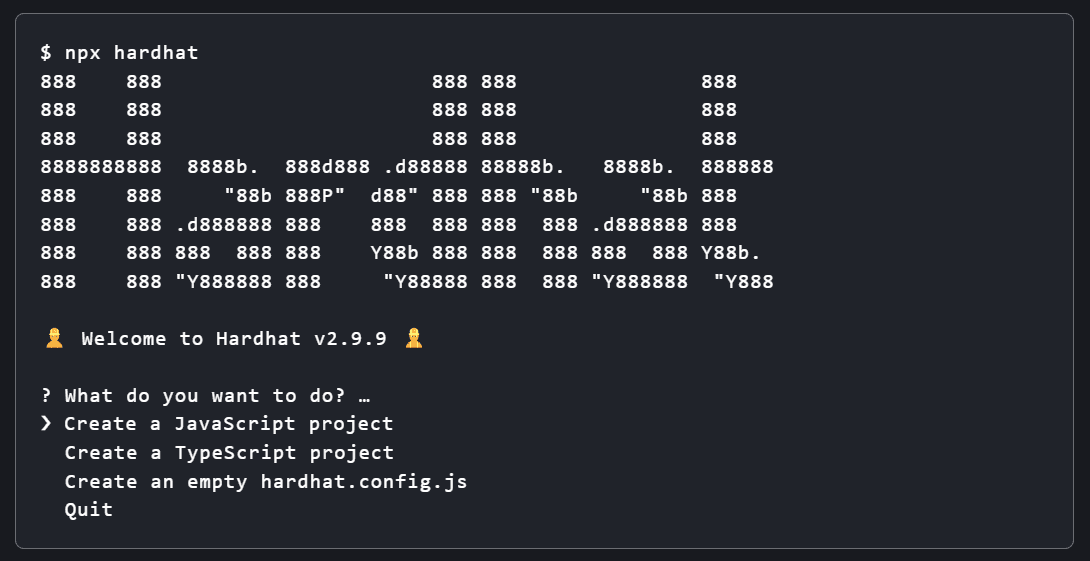
Initialize a new Hardhat project:
1npx hardhat
2
Choose "Create a basic sample project" and follow the prompts. This will create a sample project with a basic configuration.
Step 2: Writing the Smart Contract
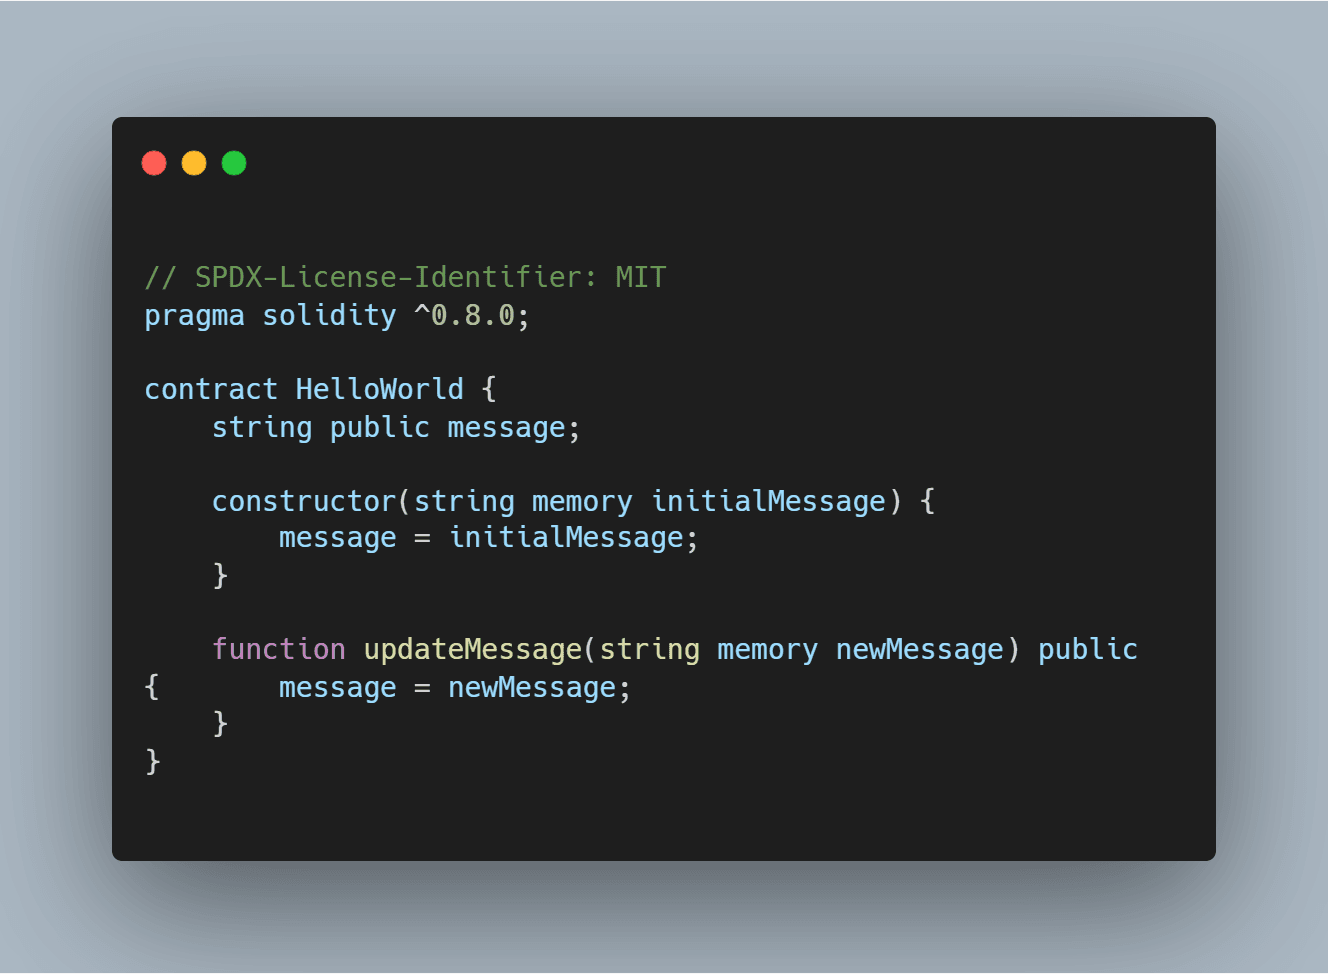
In the contracts folder, create a new file named HelloWorld.sol with the following content:
Step 3: Configuring Hardhat
Update
hardhat.config.jsEdit the
hardhat.config.jsfile to include the Polygon Amoy testnet configuration: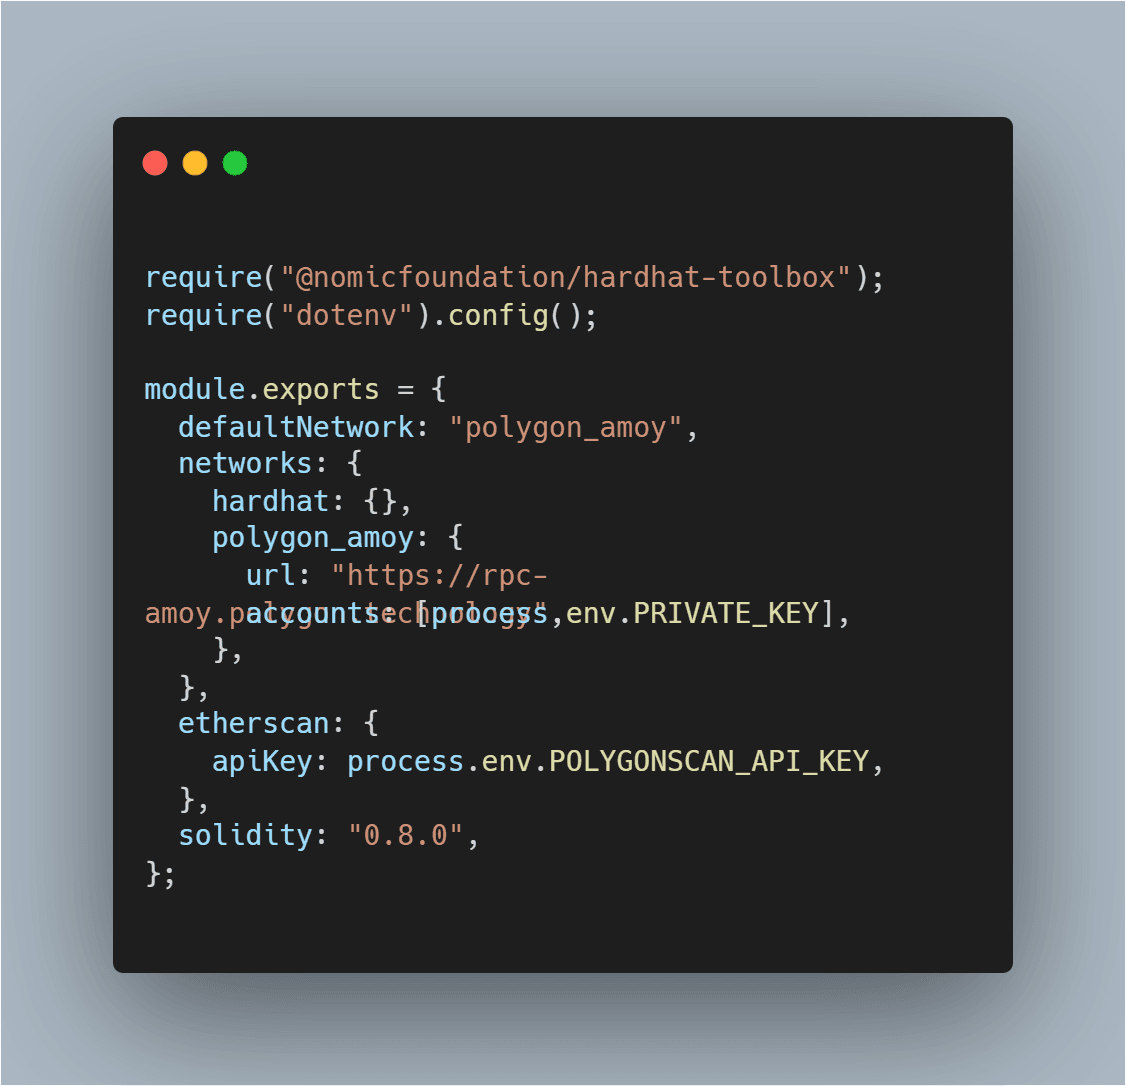
Set Up Environment Variables
Create a
.envfile in the root directory of your project and add your private key and Polygonscan API key:PRIVATE_KEY=your_private_key
POLYGONSCAN_API_KEY=your_polygonscan_api_key
Step 4: Compiling the Contract
Compile your smart contract using Hardhat:
npx hardhat compile
Step 5: Deploying the Contract
Create a Deployment Script
In the
scriptsdirectory, create a new file nameddeploy.jswith the following content: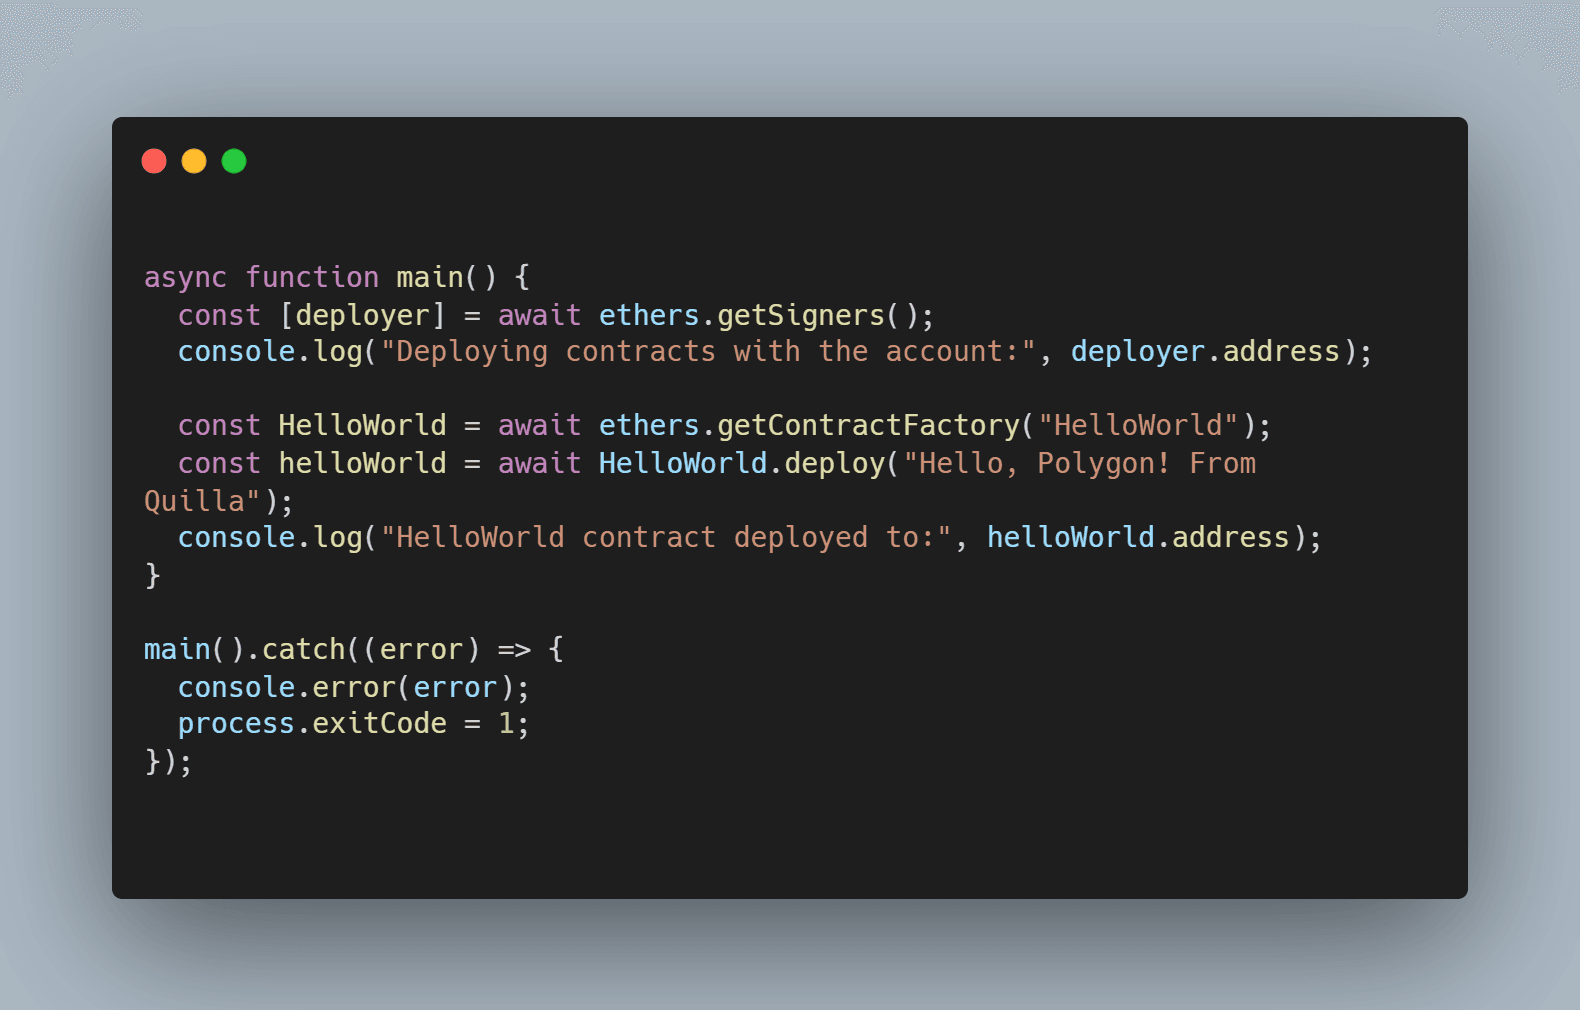
Deploy to Polygon Amoy
Deploy your contract by running:
npx hardhat run scripts/deploy.js --network polygon_amoy
Step 6: Verifying the Contract
Verify your contract on Polygonscan:
npx hardhat verify --network polygon_amoy <your_contract_address> "Hello, Polygon! From Quilla"
Step 7: Compiling the Contract
First, install Hardhat by running:
npm install --save-dev @nomicfoundation/hardhat-toolbox
Then, compile your contract with:
npx hardhat compile
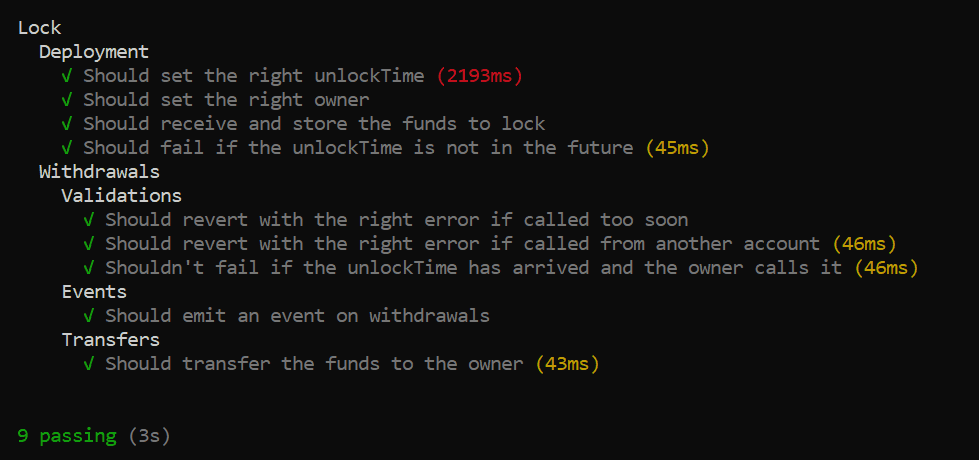
Step 8: Testing the Contract
To test your contract using Hardhat, simply run:
npx hardhat test
You should see an output similar to this:
Deploying to Polygon PoS Mainnet
To deploy directly to the Polygon PoS mainnet, you only need to make a few changes in the Hardhat configuration:
Update
hardhat.config.jsfor MainnetReplace the
polygon_amoynetwork configuration with the following for the Polygon PoS mainnet: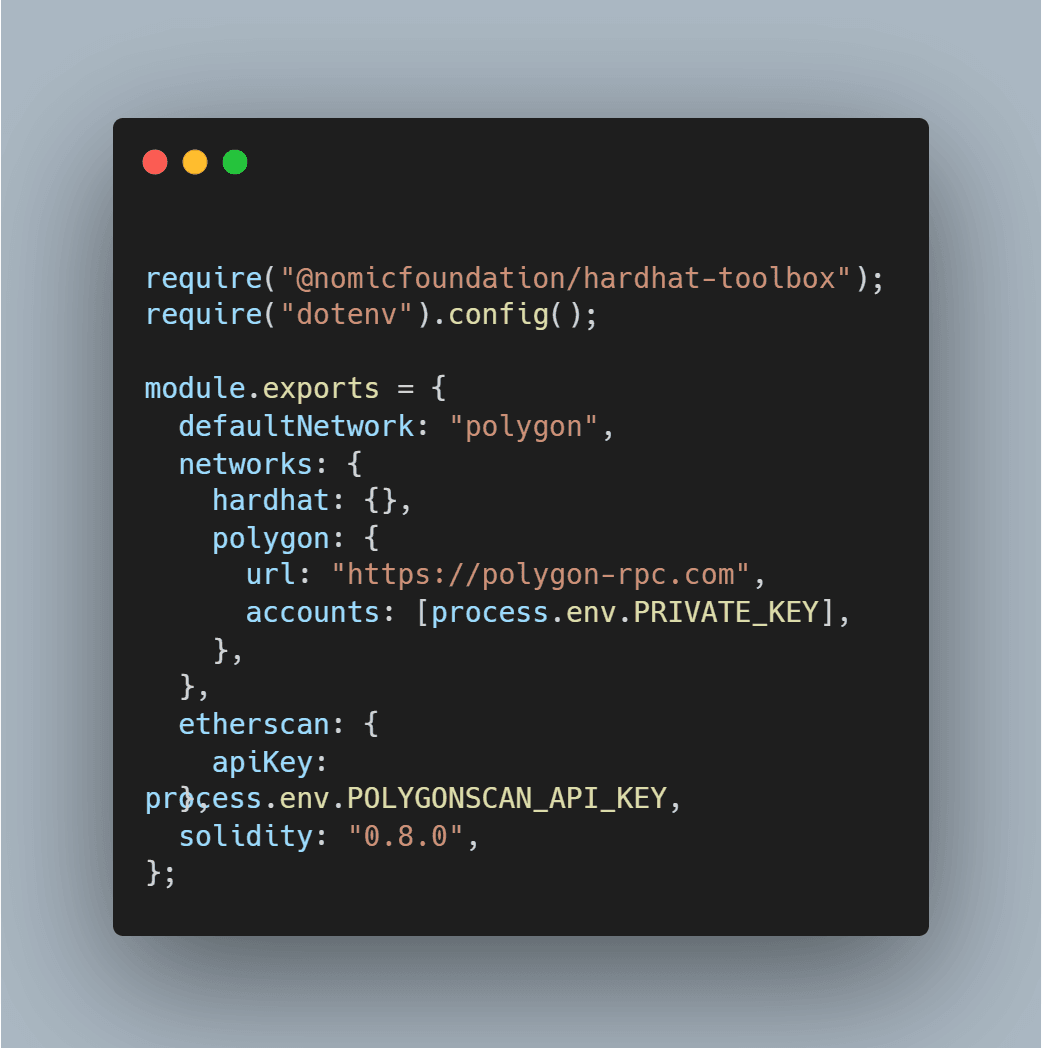
Deploy to Polygon PoS Mainnet
Deploy your contract by running:
1npx hardhat run scripts/deploy.js --network polygonVerify the Contract on Polygon PoS Mainnet
Verify your contract on Polygonscan:
1npx hardhat verify --network polygon <your_contract_address> "Hello, Polygon! From Quilla"
Deploying a Smart Contract Using Remix
Getting Started with Remix IDE
Open Remix IDE
Visit Remix IDE.
Create a New File
Click on the "New File" button and name it
HelloWorld.sol.
Writing the Smart Contract
Copy and paste the following code into your new HelloWorld.sol file:
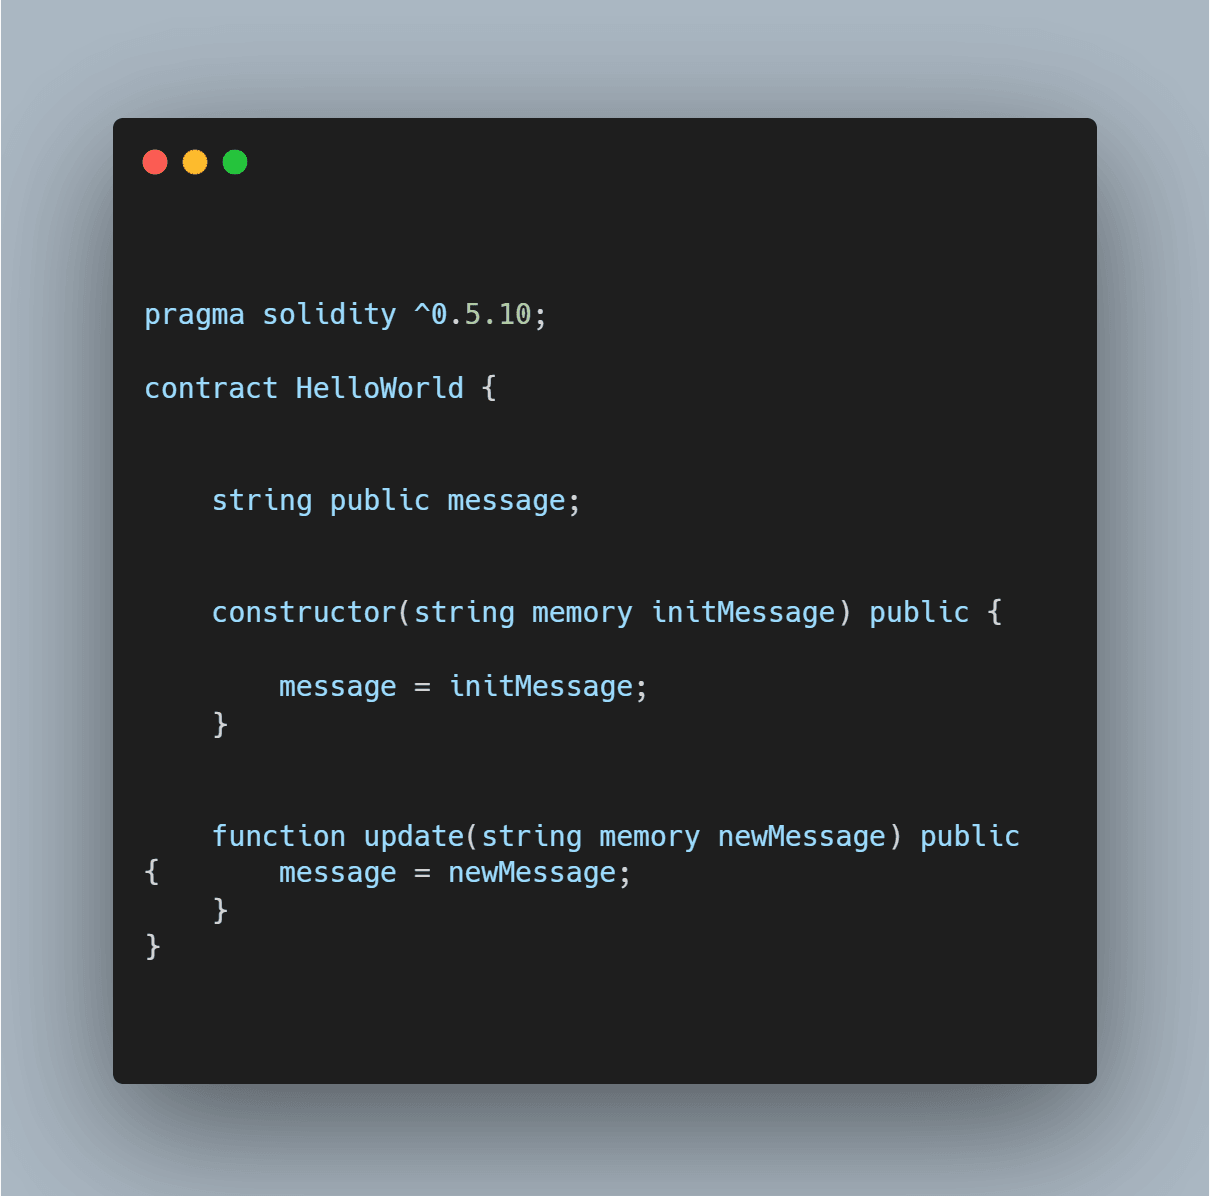
Compile the Smart Contract
Go to the Solidity Compiler Tab
Select the Solidity compiler version
0.5.10.
Compile the Contract
Click the "Compile HelloWorld.sol" button. You should see a green checkmark indicating a successful compilation.
Connect to the Polygon Amoy Testnet
Setup MetaMask
Install MetaMask if you haven't already. MetaMask Download.
Add the Polygon Amoy Testnet to MetaMask
Open MetaMask and click on the network dropdown menu. Select "Add Network" and input the following details:
- Network Name: Polygon Amoy Testnet
- RPC URL:
https://rpc-amoy.polygon.technology - Chain ID:
80002 - Currency Symbol: MATIC
- Block Explorer URL:
https://amoy.polygonscan.com
Get Test MATIC
Request test MATIC from the Polygon Amoy Faucet.
Deploy the Smart Contract
Connect Remix to MetaMask
In Remix, go to the "Deploy & Run Transactions" tab. Select "Injected Web3" in the Environment dropdown. MetaMask will prompt you to connect; accept the connection.
Deploy the Contract
Ensure your contract is selected, then click "Deploy". MetaMask will prompt you to confirm the transaction. Once confirmed, your contract will be deployed to the Amoy testnet.
Verifying the Contract
Flatten Your Smart Contract
Use a tool like
truffle-flattenerorsol-mergerto flatten your contract if it contains multiple files:1sol-merger "./contracts/*.sol" ./buildVerify on Polygonscan
Navigate to your contract’s page on Amoy Polygonscan and click on "Verify and Publish".
- Select "Solidity (Single File)" for compiler type.
- Choose the appropriate compiler version.
- Select the license type.
- Paste your flattened contract code into the verification form.
- If optimization was enabled during deployment, ensure you select the corresponding option.
Deploying to Polygon Mainnet
Add Polygon Mainnet to MetaMask
In MetaMask, click "Add Network" and input the following details:
- Network Name: Polygon Mainnet
- RPC URL:
https://polygon-mainnet.g.alchemy.com/v2/{your-api-key} - Chain ID:
137 - Currency Symbol: MATIC
- Block Explorer URL:
https://polygonscan.com
Deploy to Mainnet
Ensure your MetaMask wallet has sufficient MATIC for gas fees. Repeat the deployment steps in Remix, selecting "Injected Web3" for the Polygon Mainnet.
Verify on Polygonscan
Verify your contract on Polygonscan as you did with the Amoy testnet.
Deploying a Smart Contract Using Replit
Prerequisites
- Replit Account: Create an account at Replit.
- MetaMask Wallet: Install MetaMask and create a new account for testing.
- Polygon Configuration on MetaMask: Configure Polygon Amoy testnet on MetaMask.
- Testnet Tokens: Obtain test MATIC tokens for gas fees.
Working with a Repl
Log In or Create an Account
After logging in, you will see a dashboard where you can view and create projects.
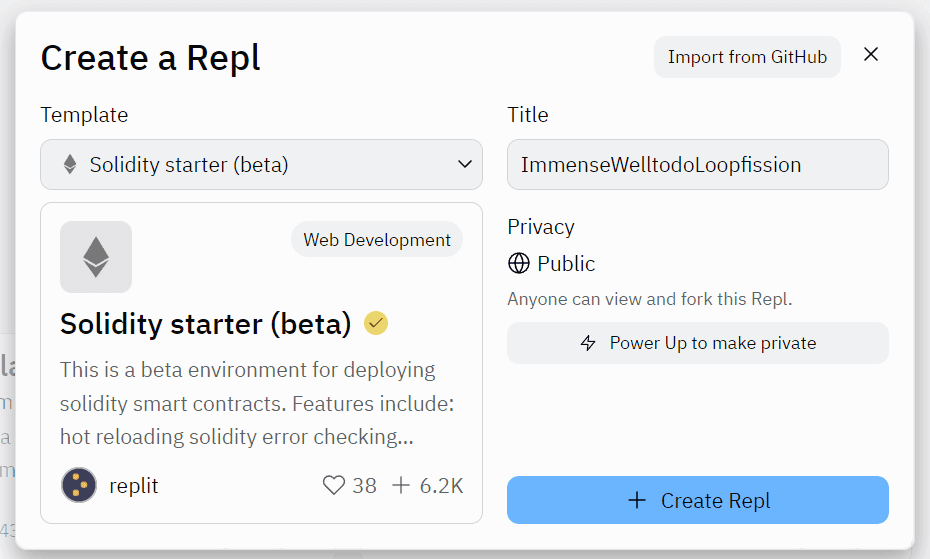
Create a Solidity Starter Repl
- Click on "+ Create Repl" from the left panel or the top right corner.
- Select the Solidity starter (beta) template.
- Give your project a title and click on "+ Create Repl".
The Solidity starter repl includes a browser-friendly interface built using the Web3 Ethereum JavaScript API, allowing you to deploy and interact with contracts.
Deploy on Polygon Amoy Testnet
Install Packages
Click "Run" at the top to install all relevant packages and start the contract deployment UI.
- Connect MetaMask
- Connect your MetaMask wallet to the web interface and switch to the Amoy testnet.
- Click "Connect wallet," select your account, and choose "Connect."
- Deploy the Contract
- Select the contract you want to deploy from the dropdown list.
- Click "Deploy."
- Confirm the transaction in the MetaMask popup window.
Verifying and Testing Your Contract
Check Deployment
Navigate to Polygonscan to search for your account, view your deployed contract, and copy your account address.
Interact with the Contract
After deployment, the contract will appear as expandable boxes below the dropdown box in the UI. Expand the boxes to interact with the contract functions.
Publish to Replit
Replit allows you to publish your projects to your personal profile for others to explore, interact with, clone, and collaborate.
- Publish Your Project
- Select the project title at the top of the screen.
- Complete your project name and description.
- Click "Publish."
Here is a Video Tutorial on How to Write & Deploy a Smart Contract on Polygon

Check Out Our Work
We've audited top DApps and DeFi protocols, ensuring they remain secure and Free from Hacks. Check out their audit reports to see our impact.

Final Thoughts
By following these steps, you can easily deploy your smart contract on both the Polygon Amoy testnet and the Polygon PoS mainnet. The key differences lie in the network configurations and endpoints, but this guide ensures a smooth transition from testnet to mainnet deployment.
Before you deploy on the mainnet, always prioritize security. You can use our QuillShield, an AI agent that checks your code for vulnerabilities and even fixes them.
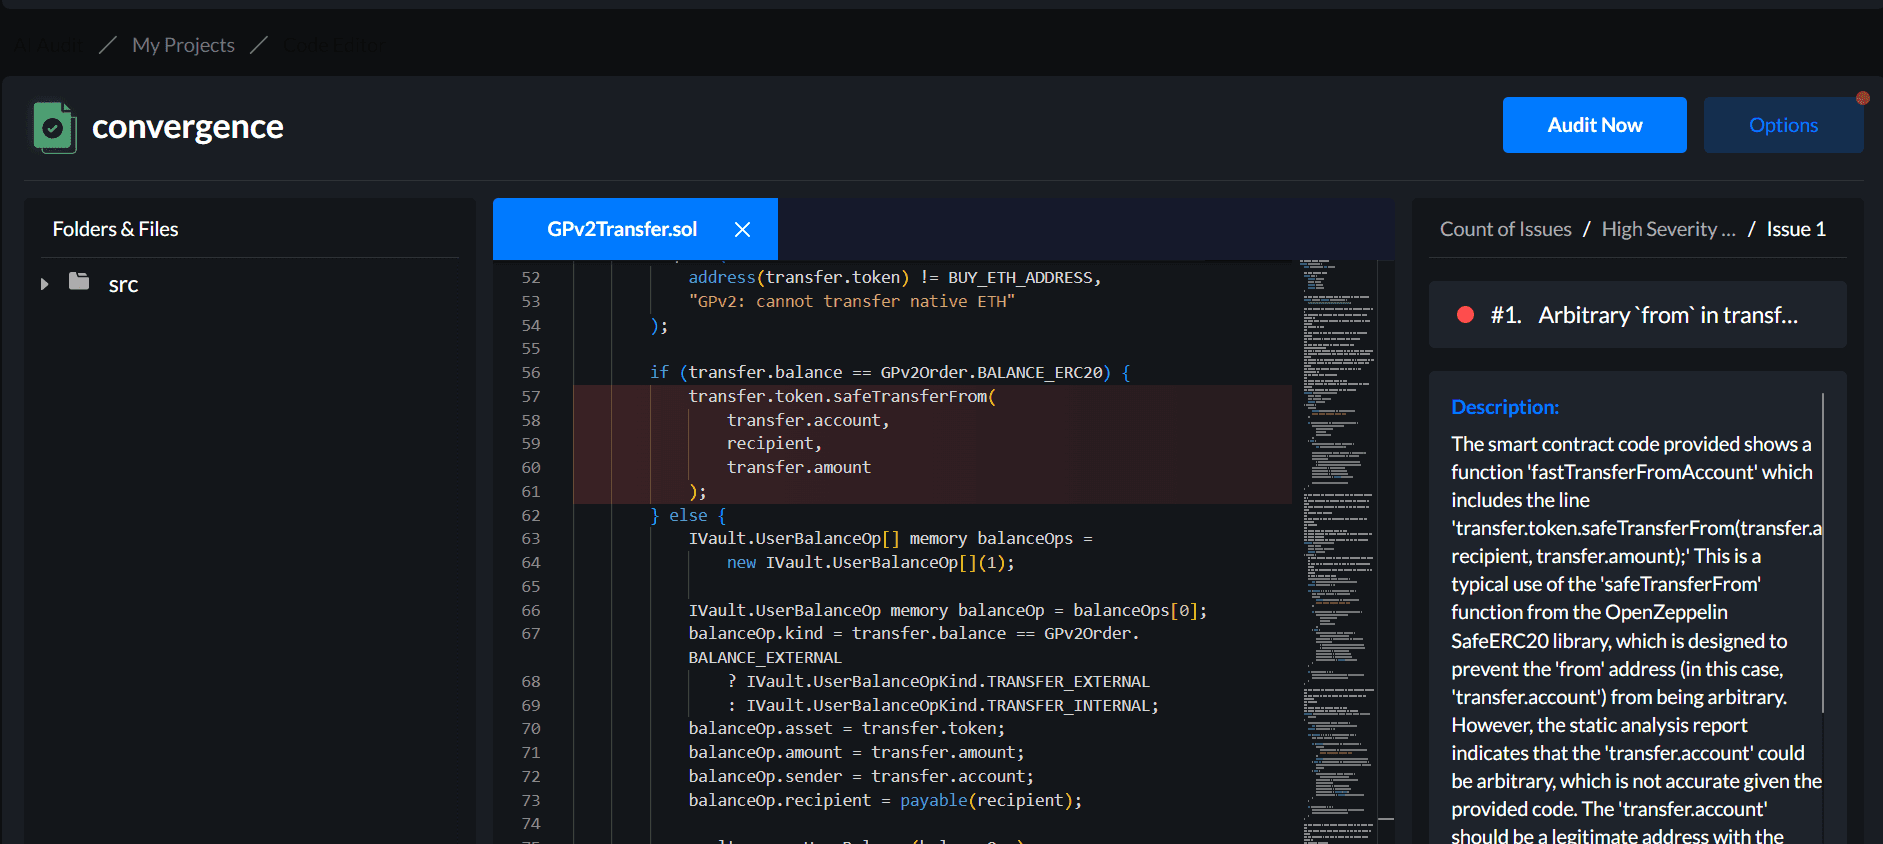
This tool can be incredibly handy. And of course, it's crucial to have your contract audited before the final deployment to ensure everything is secure.
Happy coding!
Contents


